You may notice I have renamed my blog! I have been thinking about this for a while and finally settled on a new name. I just felt the first name was no longer appropriate as I blog about such a variety of things. The URL is still the same - that hasn't changed. I would love to hear any comments about the new name or any suggestions!
I'm working on another project - a set of Scripture greeting cards - and I hope to share those with you soon.
Thanks again for visiting!
Wednesday 29 June 2011
Tuesday 28 June 2011
Choosing Books
I love books. My husband loves books. My kids love books. So naturally, we have a lot of books in our house. In fact, I'm in the study and there are over 400 books of various types in here! That's not all the books we have. The kids have some in their bedrooms and we have an almost full bookcase in the living room. I love incorporating lots of reading into our homeschooling - real books, "living books" as Charlotte Mason would call them.
I'm quite discerning about what books we have because obviously we don't have room for every "good" book there is. I tend to like classics and older books (Jane Austen, Charlotte Bronte, Charles Dickens, L M Montgomery, A A Milne, Laura Ingalls Wilder, Robert McCloskey, etc), but are also some really fine newer books (my kids love If You Give a Mouse a Cookie and If You Give a Moose A Muffin, for example).
I have 3 tips for choosing books:
1. Get a good book list to help you. I use the book lists that go with the Sonlight curriculum (you can order a free catalogue from them) and Honey for a Child's Heart by Gladys Hunt. I don't agree with every single choice on either of these lists, but they are both good resources. You could also ask people for their recommendations or try to remember what books you enjoyed reading as a child.
2. Use your public library. I am so thankful for our provincial library system! I can search for and order books online and then go and pick them up at my local branch. I realise not everyone has access to a public library, especially if you live in a remote area, but you can get many books in eBook format online and often you can find free ones. By using the library, you can try out books to see what they are like without the cost of having to go out and buy them. If you come across a book you don't like, return it. Easy.
3. Make a wish list of books that you know you really want (ones that you've "previewed" and you know you'll want to read again and again). Keep your list handy when you're out. Thrift shops and second hand stores are great places to find books. Of course, there are usually lots of "junk" books in places like these, but sometimes you can find real treasures as well. About a month ago, I found a brand new hardcover biography of Thomas Cranmer for my husband - for $1. I have found stacks of older Scholastic editions of some of my childhood favourites for 25 - 50 cents apiece. Our library has a book sale of old and discarded books every spring (VERY inexpensive). One year, I bought a stack of antique books, a number of children's books and a couple of fiction books for me for $5.
Of course, the most important book of all is the Bible. Many have received a fine education from this one book. It is something no home should be without. Some books may be good books, some may be great books, but the Bible is the best of all. There is no other book like it. "All scripture is given by inspiration of God, and is profitable for doctrine, for reproof, for correction, for instruction in righteousness: That the man of God may be perfect, throughly furnished unto all good works." 2 Timothy 3.16&17
So, I guess I actually have 4 points in the end:
- Get a good book list.
- Use your library.
- Make a wish list.
- Never forget the importance and value of the Bible.
Thanks for visiting today! I'm linking this post to the Hip Homeschool Hop.
ASD Assessment Today
Today we go for the first part of our son's autism spectrum disorder assessment. We are amazed and grateful that we got these appointments so quickly. We had initially been told it would take at least a year. Also, we got the paperwork 3 days before the postal strike/lockout shut down the postal system. It is amazing how God works these things out! The appointment today is 3 hours long and the one next week is 2 1/2 hours long. After all this, we may have a better grasp on what's going on. Prayer would be appreciated!
"Peace I leave with you, my peace I give unto you: not as the world giveth, give I unto you. Let not your heart be troubled, neither let it be afraid." John 14.27
"Peace I leave with you, my peace I give unto you: not as the world giveth, give I unto you. Let not your heart be troubled, neither let it be afraid." John 14.27
Monday 27 June 2011
Project as Promised
I promised I would share one of my latest projects over a week ago. Well, here it is! I made this set as a gift for a dear friend.


This is the actual greeting card I made to go with the gift. I just used the Shabby Mommy papers again on yellow cardstock. "Best Wishes" and "Congratulations" are both from the "Sentiments" clear stamps and the calendar is from the "Calendar" clear stamps by Kelly Panacci/ Sandylion. The little flower is made from diecuts I got at the dollar store and a tiny Making Memories square brad in metallic gold.


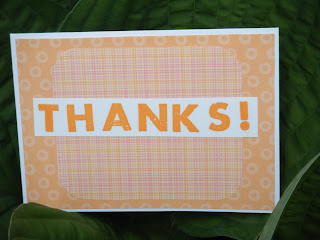
For these first three cards I used a line of digital paper from Shabby Princess called Shabby Mommy (this link will take you to the download page). These kits are full of different papers, embellishments, and alphabets that can be used either digitally or by downloading and printing out whatever you want. I used heavy weight copy paper to print the papers and embellishments on. I started with small note card blanks in white to complement the paper colours I chose. I used the StripedPaper, PinkDotsPaper, and OrangeDotsPaper papers and the PlaidMat embellishment. The sentiment "THANKS" was stamped on white cardstock using the "rugged alphabet" stamps from Paper Salon and bright pink and bright orange pigment ink ("Color Arts" brand).

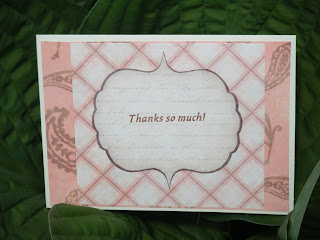
This card was also made using a Shabby Princess kit (Plentiful). I used the Paper Dots paper and the JournalingPaper layered on an ivory card. The sentiment was stamped using "Sentiments" clear stamps by Kelly Panacci/Sandylion and chocolate brown pigment ink by Studio g.

This last card was made using kits by Sara Sherlock called Everything Nice (paisley and worn gingham papers) and A French Romance (tag), layered on an ivory card base. The sentiment is another of my dollar store stamps and the same chocolate brown ink as above.


This is the actual greeting card I made to go with the gift. I just used the Shabby Mommy papers again on yellow cardstock. "Best Wishes" and "Congratulations" are both from the "Sentiments" clear stamps and the calendar is from the "Calendar" clear stamps by Kelly Panacci/ Sandylion. The little flower is made from diecuts I got at the dollar store and a tiny Making Memories square brad in metallic gold.

This is how I packaged the gift - I covered a card box with some of the patterned paper I used in the project and then tied it shut with some off white cotton yarn.
I hope I don't bore anyone with my exhaustive details, but I like to be precise and make sure I give credit to the proper people!
Just a note to any crafters visiting, if you download a designer's freebies, please thank them! They put a lot of work into these files they give away so you can at least say thanks - it only takes a minute of your time. That's my rant for today!
Thanks for visiting!
Friday 24 June 2011
Vegetable Garden At Last
I finally started planting some vegetables today! It's been quite cool here and we even had frost a couple of nights ago. So, I've been hemming and hawing about when to plant but I decided to take the plunge this afternoon. We don't have a big area ploughed up or anything, so I just have a few little plots around the yard.
We had a bare spot behind our shed, so we dug it up well and mixed in a good dose of "fertilizer" aka bunny poop, etc. When I told my kids what we were going to mix into the clay, they were pretty disgusted! I decided to plant some zucchini here because there is lots of room for it to spread out.
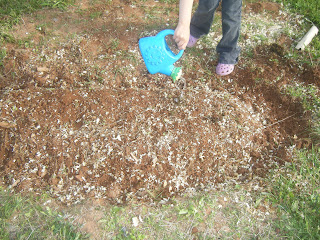

We had a bare spot behind our shed, so we dug it up well and mixed in a good dose of "fertilizer" aka bunny poop, etc. When I told my kids what we were going to mix into the clay, they were pretty disgusted! I decided to plant some zucchini here because there is lots of room for it to spread out.

There is our little finished zucchini plot! We'll likely be overrun with them by August. My husband says the only reason why it's not safe to leave your car unlocked in the summer on PEI is that you may come back to a car full of zucchini and cucumbers!
By the way, can you guess what crop is planted in the field behind our place this year?

Thanks for visiting today!
Wednesday 22 June 2011
Garden Discovery
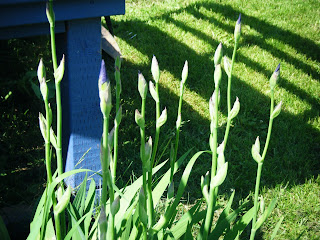
My irises have been blooming for about a week now. They are one of my favourite flowers and so easy to grow. A lady from our chapel gave me a garbage bag full of iris plants a few years ago. There were probably at least 50 rhizomes. I gave a bunch away and planted the rest wherever I had room for them. My biggest planting is by the steps.


I just love the blue/purple colours. They make me happy whenever I look at them. I'm so glad I said yes to the garbage bag full of plants when I had no idea where I would plant so many.
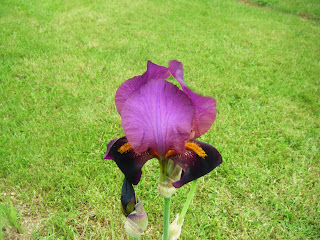
Then, a couple of days ago, I discovered THIS:


Where on earth did that come from? I've had these plants for three years and thought they were all the same variety. Apparently not. This one is a deep, rich purple with golden yellow. Please excuse the iffy photos - it's super windy here today. Not only are these a completely different colour, they are much larger as well - at least twice as large.

These two plants are side by side. See the difference in size? To top it off, I have not one but TWO of these darker irises. I'm pretty excited! I almost dug up all these plants and gave them away this spring. I did dig up a couple, but I'm glad I kept these. A nice surprise!
Thanks for visiting today!
Tuesday 21 June 2011
Psalm 1
In our chapel Bible study, we are now working our way through the Psalms (my husband is speaking on Psalm 3 tonight). This morning, I was just looking through the first few Psalms. I think Psalm 1 is one of my favourite passages. About 5 years ago, we acquired a Psalter and started learning some of the Psalms set to metre. Of course, the first one we learned (and the only one I can remember off the top of my head) was the first Psalm. Here is the metrical version of the first two verses:
That man hath perfect blessedness
who walketh not astray
In counsel of ungodly men,
nor stands in sinners' way,
Nor sitteth in the scorner's chair:
But placeth his delight
Upon God's law, and meditates
on his law day and night.
I wanted to include an audio or video link, but I could only find this sung to a different tune than we use or in Gaelic. (Gaelic is a beautiful language but I don't understand 99% of it!) We are accustomed to singing acapella. We do not use musical instruments at our breaking of bread meeting or our Bible study. There is something wonderful about the sound of unaccompanied human voices singing as a group. Some sing very well and some not so well, but the combined sound is quite nice. "Make a joyful noise unto the LORD, all the earth: make a loud noise, and rejoice, and sing praise." Psalm 98.4
This psalm is what the life of a Christian should look like: steering clear of the lifestyle of the ungodly and approval of their sin and living a life of purity before God The Christian should not be rationalising or justifying his/her wrong behaviour but making their life line up to what God says in His Word - the Bible. That must always be the final authority.
I am linking this post to the Hip Homeschool Hop. Thanks for visiting today.
Friday 17 June 2011
Break Time
We're taking a little break from homeschooling this week to relax a little and catch up on some stuff around the house - like laundry! ;) A friend of mine from Bible School days is visiting the Island for a week, so I'm looking forward to seeing her. I'm calling this our "June Break". Since this school year got so messed up, I'm seriously thinking about year round schooling. Ah, the beauty of homeschooling. I don't know for sure yet what I'm going to do. What I do know is that my daughter is 42 days into a 160 day programme and she's not exactly zipping through the lessons. I had to redo so much foundational work with her it isn't funny.
I'm really enjoying the curriculum we're using - My Father's World First Grade. We also used their kindergarten curriculum last year. I'd like to do a review on this curriculum at some point. Many people have never heard of this company and they have some really fine material to offer and their prices are fairly reasonable.
Anyway, I'm off to bed. It's been a long day! Thanks for visiting.
Thursday 16 June 2011
Thank You!
I'm working on a project I'd like to share with you, but I can't until later because it's a present! In other news, my little blog has reached 400 pageviews! I am astonished that I have had "visitors" not only from Canada but also the US, the UK, Australia, Belgium, Germany, Sweden, and India in the last 3 months. I really appreciate those who take the time to read my blog. Thanks to those who have left comments and reactions - I really enjoy hearing from you.
Thanks again for visiting today!
Thanks again for visiting today!
Wednesday 15 June 2011
Missing Post
My apologies to anyone visiting here from the Hip Homeschool Moms Blog Hop. Blogger appears to have eaten the post I wrote last night (grr). I have an irrational hope that it will somehow reappear but we'll have to see!
Sunday 12 June 2011
Garden Tour 2
As promised, more garden/flower photos:


This is one of the reasons to visit Prince Edward Island in June. The ditches and roadsides are covered with these beautiful flowers. They are not only purple, but there are also white and pink ones. Lots of different shades!


First, the lupins...


This is one of the reasons to visit Prince Edward Island in June. The ditches and roadsides are covered with these beautiful flowers. They are not only purple, but there are also white and pink ones. Lots of different shades!
Next is some sort of ground cover type plant that spreads like crazy (they were here when we moved in). I haven't been able to find a name for them. The flowers are kind of pretty, but the plants tend to try to take over the whole plot.


My stripey hostas (the leaves are so dramatic)

My Dutch irises are in bud.


And Bentley, keeping watch over everything. He's a great gardening companion.
Thanks for visiting!
Tuesday 7 June 2011
Kraft Obsession
This is a card I made a while back using the vintage couple collage from Create with TLC. Paulette is SUPER generous with her beautiful work and she also has an online shop where she sells her digital stamps, backgrounds, papers, etc. I love all her vintage style stuff. If you're a crafter, go take a look at her blog and shop!

I printed the digital stamp directly on kraft cardstock using Microsoft Word - which, alas, no longer works on my computer for whatever reason :( I used rose and silver metallic gel pens (dollar store!) to accent the image a little. The sentiment ticket is from Sentiments 4 You, printed out on kraft as well and outlined with the silver metallic pen. The flower/rosette in the top left hand corner is my own creation - kind of an experiment. I cut out various sized circles of cardstock, scrunched them, folded them and messed them up before inking the edges and putting them together with one of my tiny round gunmetal brads from Making Memories.
My next card uses a silhouette image from The Graphics Fairy. I also used MS Word to print this image right onto the half-fold (8 1/2 " by 5 1/2 ") card.

I made another "shabby kraft rosette" for this card. The sentiment ticket is also from Sentiments 4 You. The sticker along the bottom is a dimensional sticker from one of my dollar store packs.
These two cards were quite an experiment for me. I'm not entirely satisfied with how they turned out, but I enjoy trying new things.
Thanks for visiting today!
Sunday 5 June 2011
Another Floral Card
I took a photo of this card weeks ago and kept forgetting to post it. I really liked how this card turned out. The cutting was kind of fussy but it actually went together quite quickly.
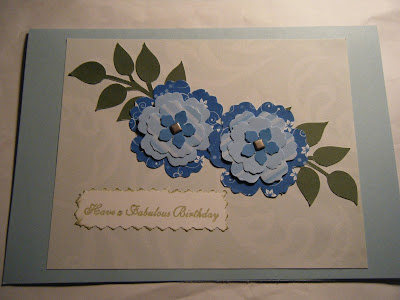
I made a half-fold card with pale blue cardstock and then added the patterned paper. The flowers and leaves are a download from Fred, She Said. I simply cut out the individual flowers and branches and layered the flowers together with a small square gunmetal finish brad from Making Memories. Then I decided how the two flowers and two branches should be placed and glued them to my backing paper (not sure what brand of paper this is - it may be K&Company or Autumn Leaves, I'm not sure.) For the sentiment, I used one of my handy dollar store stamps and sage green ink (Anna Griffin Rose Collection by All Night Media) to stamp on white cardstock. I then cut out the sentiment using my "Bubbles" decorative edge scissors and inked the edges with the sage green ink. Not too frilly, but still feminine.
I'm just starting to get the hang of inking the edges of pieces. I tend to do too much or not enough. Not enough is easier to fix than too much! It took me 3 or 4 tries to do this little sentiment to my satisfaction.
One of the best tools I have found for cutting out intricate items is kind of unusual. When we were living in Quebec for a year and a half, I needed to buy a pair of scissors. I ending up buying a set of 4 different sizes. The smallest was called "coupon clippers" and I have found them to be good for cutting out small items.

They are fairly small - as you can see from the photo. The ends of the blades are blunted, which I like (keeps me from stabbing myself ;) And the best part is... the whole set cost $3!
Thanks for visiting today!
Thursday 2 June 2011
Reading Breakthrough!

(graphic courtesy of The Graphics Fairy )
This morning, my daughter discovered she can read some of her own books by herself. She was so excited! It's like someone flipped a switch - the little girl who hated reading and writing time is now becoming a reader.
Not to be overly negative about the public school, but I shudder to think what kind of a situation she would be in if we had let her finish the year. When we took her out of public school just before Easter, she had a reading level of 10 (not sure what scale they were using) and they expected the "top dogs" (the teacher's words) to be at level 16 by mid-June. It took her from September to April to struggle up to 10 and in order to not be overwhelmed going into Grade 2, she would have to try to get up 6 more levels in 8 weeks. I don't even want to think about the stress. The teacher also told me that they didn't hold kids back unless "the parents really insisted."
We really tried to take a more relaxed approach to schooling when we brought our daughter home. We do have a general schedule and an approximate time frame, but no two days look the same. And we're not perfect of course! However, she is getting all the one-on-one attention she needs and I know what she is learning and reading all the time. We now have time to have a good, cooked breakfast and devotions together every morning; time for activities, outings, and working together when we're not having "school time"; and time for family read-alouds in the evening.
Homeschooling is really a lifestyle. In order to make life-long learners, you have to be able to show your kids how to use the information they are being taught. If you took a recipe for chocolate cake, showed your kids the photo of the finished product, read out the list of ingredients, explained the steps and made sure they understood every term - even if you did all that you still wouldn't have a chocolate cake! They might understand the process to make the cake but they haven't made one. Another example could be geometry (by the way, I am not strong in math so I dread the day when I have to teach something I'm not good at!) . You explain the concepts, they do the assigned problems, they comprehend the subject, but they have no idea how to use it in real life! It's just "schoolwork" to them. However, it's not something invented to torture people's brains with - it's useful! Carpenters, landscapers, surveyors ... all kinds of jobs use this kind of math everyday. You not only have to teach the concepts, you have to teach why you need to know these things.
"Education is not filling a bucket, but lighting a fire." - William Butler Yeats
Thanks again for visiting today and I would love to read any comments you might have on this or any of my other posts!
Wednesday 1 June 2011
Sheets to Swiffers
Another frugal household idea for you today. I recently saw how a woman had used an old chenille sock and some knit (t-shirt) scraps to make a washable, reusable Swiffer cloth. She was a sewing whiz and while I liked the idea, I can't sew (and I don't have a sewing machine). I have in the past just attached a rag to my Swiffer to use when I didn't have the proper cloths. While (trying) to declutter my house, I got an idea.
I don't know if "Brunswick Sheets" or "Health Sheets" are common in other areas, but they are quite popular here. They are basically polar fleece sheets and they are so incredibly comfortable! I have used them for about ten years and just love them. They can be quite pricey but the quality is excellent and they should last for many years. (By the way, these are my own opinions on these products and I have no connections with either company!)
Anyway, back to the Swiffer. My oldest set of fleece sheets (the first ones I got 10 years ago!), finally had the elastic go on them and I couldn't keep them on the bed. I hung on to them for a while and finally put one to use today.

First of all, I laid out the sheet on the table and cut the corner seams out so all the fabric would be flat and easier to work with.

Next, I put the Swiffer on the sheet to figure out approximately how big to cut the pieces.

You will want to have enough overhang of the fabric to tuck into the little grabby things (my very technical term!) on top of the Swiffer head.

Then you just cut your piece of fleece sheet to the needed size (notice how terribly even my piece is?). Use fabric shears for the best result and least amount of annoyance. ;)

With the fluffy side down, place your Swiffer on the top and attach the piece of fleece (using the little grippy things).

Tada - reusable Swiffer sweeper cloths! I didn't use the middle of my fitted sheet and I still got 6 cloths for the Swiffer. (By the way, I cut up the middle for "regular" rags. The outside edges were the fluffiest and I thought they would work better with the Swiffer.)
I'm sure you could use other worn out linens or articles of clothing (like towels, socks, or t-shirts), as long as the fabric has a bit of texture and absorbency. I'm planning on using my cloths both wet and dry and tossing them in the laundry when I'm finished with them. A really great ("green" and frugal) cleaner to keep mixed up in a spray bottle is 2 cups of water, 1/2 cup white vinegar, and about a tablespoon of dish soap. You can just squirt it on the floor and use your Swiffer with its reusable cloth for quick clean ups.
Excuse me, I have to go clean my floor now...Thanks for visiting today!
Subscribe to:
Posts (Atom)